NSO 서비스 개발
1. Why service?
- 네트워크 서비스를 구축하는 특정 장치 및 시스템 구성에 집중하는 대신, 중요한 입력 정보만 수집하고 나머지 프로세스를 자동화
- 일관된 구성, 오류 및 중단 방지, 전반적인 네트워크 관리 비용 절감의 효과
Netsim 환경 설정
- netsim 장치와 NED 패키지 준비
source $NCS_DIR/ncsrc
cd ~/src
ncs-netsim --dir nso-instance/netsim create-network $NCS_DIR/packages/neds/cisco-ios-cli-3.0 1 dist-rtr
ncs-netsim --dir nso-instance/netsim add-to-network $NCS_DIR/packages/neds/cisco-ios-cli-3.0 1 internet-rtr
ncs-netsim --dir nso-instance/netsim add-to-network $NCS_DIR/packages/neds/cisco-ios
- NSO 인스턴스 생성
ncs-setup --dest nso-instance --netsim-dir nso-instance/netsim
- netsim 및 nso 시작
cd nso-instance/
ncs-netsim start
ncs
- 장치 구성 수정
NCS_IPC_PORT=5010 ncs_load -Fc -l -m << EOF
interface GigabitEthernet5
description A GigE interface
no shutdown
ip address 192.168.1.10 255.255.255.0
EOF

NCS_IPC_PORT=5012 ncs_load -Fc -l -m << EOF
interface GigabitEthernet 0/0/0/1
description A GigE interface
ipv4 address 192.168.2.10 255.255.255.0
EOF
- NSO 접속 및 장치 동기화
ncs_cli -C -u admin
devices sync-from
exit
NSO에 기존 개발된 서비스 추가
- l3vpn 추가
git clone https://github.com/CiscoDevNet/nso-lab-files.git ../lab-files/
cp -r ../lab-files/service-dev/packages/l3vpn/ packages
- 새 패키지를 사용하기 위한 인식 가능한 파일로 변경
make -B -C packages/l3vpn/src/
- nso 접속 및 package reload
ncs_cli -C -u admin
packages reload
exit
서비스 모델 및 서비스 인스턴스
- 아직 서비스 인스턴스가 구성되지 않은 상태
[developer:nso-instance]$ yanger -f tree packages/l3vpn/src/yang/l3vpn.yang | sed -n -e '/l3vpn/p' -e '/link/,$p' module: l3vpn +--rw l3vpn* [vpn-name] +--rw link* [link-id] +--rw link-id? uint32 +--rw link-name? string +--rw pe-device? -> /ncs:devices/device/name +--rw interface? string +--rw routing-protocol? enumeration +--rw static-route* [prefix] +--rw prefix? inet:ipv4-address +--rw mask? inet:ipv4-address - 서비스 인스턴스 구성
ncs_cli -C -u admin

config
services l3vpn test-vpn vpn-id 10001 customer Cisco link 1
interface 5 link-name branch-office pe-device dist-rtr0 routing-protocol static static-route 10.0.0.0 mask 255.255.255.0
top
show configuration
- 변경 사항 반영
commit and-quit
show running-config devices device dist-rtr0 config | nomore
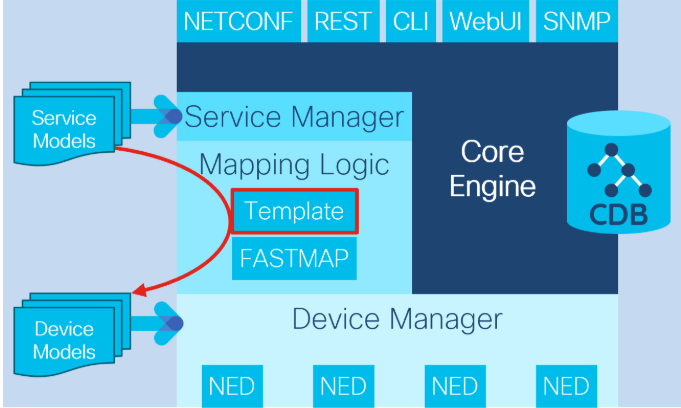
서비스 유형
- Template 기반 서비스
- 매핑은 XML 템플릿을 사용해 구현
- 쉽고 빠르게 개발 가능
- 서비스 매개변수 조작 및 통합에 대한 옵션이 제한적
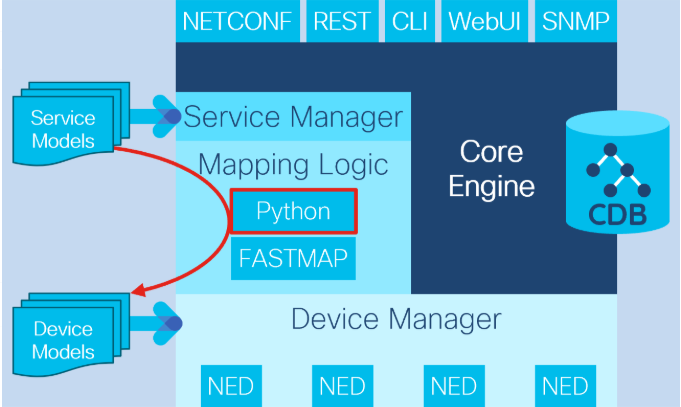
- Python 또는 JAVA 기반 서비스
- 구현을 위한 추가 옵션 - IP 주소 계산, 추가 매개변수 확인
- 외부 시스템과의 통합 기능(IP 주소 관리[IPAM])
- 코드에서 장치에 대한 매핑 구현이 더 어려움
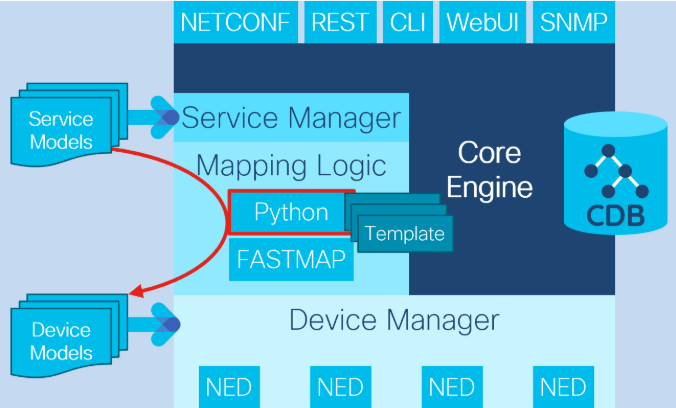
- Python, Java, Template 기반 서비스
- 두 가지 접근 방식의 장점
- 장치 구성에 매핑하기 위한 템플릿
- 계산 및 통합을 위한 Python 코드
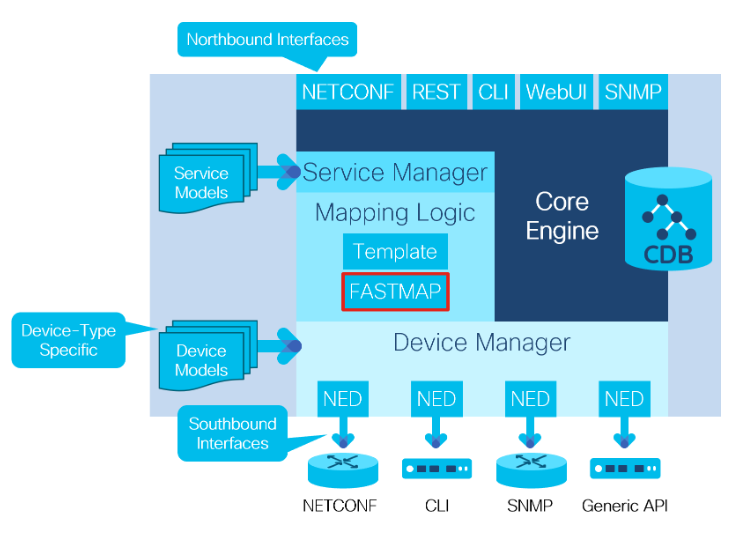
2. FASTMAP
FASTMAP이란?
- 서비스 모델에서 장치 모델로의 변환을 지원하는 알고리즘
- 서비스 개발자는 템플릿이나 코드를 사용해 create 메서드를 작성하고, NSO는 delete 및 update 메서드를 관리
- FASTMAP은 장치에 대한 구성 작업을 제어하고 최적화 하며, 특정 구성 상태에 도달하는데 필요한 최소 변경 사항을 항상 계산
FASTMAP 작동 방식
- 터미널 진입
ncs_cli -C -u admin
config
- l3vpn 서비스 인스턴스 생성
no services l3vpn
commit
services l3vpn test-vpn vpn-id 10001 customer Cisco link 1
interface 5 link-name branch-office
pe-device dist-rtr0
routing-protocol static static-route 20.0.0.0 mask 255.255.255.0
commit
top
- 생성한 인스턴스 정적 경로 변경
no services l3vpn test-vpn link 1 static-route 20.0.0.0
services l3vpn test-vpn link 1 static-route 30.0.0.0 mask 255.255.0.0
commit dry-run outformat native
- 서비스 인스턴스 제거 및 구성모드 종료
no services l3vpn test-vpn
commit dry-run outformat native
abort
공유 구성 처리
- Refcount를 사용해 Backpointers 특정 장치 구성을 소유한 서비스 추적 가능
config
no services l3vpn test-vpn
commit and-quit
show running-config devices device dist-rtr0 config interface GigabitEthernet 5 | display service-meta-data
3. 서비스 모델링 접근 방식
서비스 개발 시작 고려요소
- 어떤 것을 구성하는 서비스인지?
- 사용자에게 어떤 구성 옵션을 제공하고 싶은지?
- 어떤 유형의 기기가 지원되는지?
- 외부 통합이 필요한지?
- 고려해야할 환경이 있는지?
TopDown 개발
- 상위 수준 서비스 설계를 기반으로 시작해 YANG 모델로 변환되는 그린필드 구축에 적합
- XML 템플릿 생성 시 YANG을 특정 디바이스 구성에 매핑
- NSO는 디바이스 구성 및 XML 출력을 지원하므로 수동 작성 필요 X
- NSO CLI를 이용한 VLAN 서비스 개발
- NSO 접속
ncs_cli -C -u admin
config
- 각각의 VLAN 구성
config
devices device core-rtr0 config vlan 101
exit
interface GigabitEthernet 0/0/0/4 switchport mode access
switchport access vlan 101
top
commit dry-run outformat xml
abort
- NSO 접속
Bottom-up 개발
- 보통 이미 config가 구현되어 있기에 수동으로 구성할 필요가 없다
- 기존에 구현된 정보를 확인하고 저장하고 싶으면 NSO 명령어로 가능하다
devices device {device name}
sync-from
위의 명령어를 통해 해당 장치의 config가 cdb에 동기화
4. 템플릿 기반 서비스 만들기
루프백 인터페이스 생성
- 터미널 진입 후 패키지 생성package-meta-data.xml 파일을 통해 현재 서비스 패키지 구성, 버전 확인 가능
cd ~/src/nso-instance/packages ncs-make-package --service-skeleton template loopback cd loopback ├── package-meta-data.xml ├── src │ ├── Makefile │ └── yang │ └── loopback.yang ├── templates │ └── loopback-template.xml └── test ├── internal │ ├── lux │ │ ├── basic │ │ │ ├── Makefile │ │ │ └── run.lux │ │ └── Makefile │ └── Makefile └── Makefile - YANG 모델 생성
vi src/nso-instance/packages/loopback/src/yang/loopback.yang module loopback { namespace "http://com/example/loopback"; prefix loopback; import tailf-ncs { prefix ncs; } list loopback { key name; uses ncs:service-data; ncs:servicepoint "loopback"; leaf name { type string; } leaf device { type string; } leaf ip-address { type string; } leaf loopback-intf { type uint32; } } } - NSO가 변경된 YANG 모델을 사용하기 위해 패키지 저장 및 빌드
make -C ~/src/nso-instance/packages/loopback/src
- config 생성
- NSO cli 접속을 통한 방법
ncs_cli -C -u admin

config
devices device dist-rtr0 config interface Loopback 100
ip address 192.168.10.20 255.255.255.255
top
devices device core-rtr0 config interface Loopback 100
ipv4 address 192.168.10.20 255.255.255.255
top
commit dry-run outformat xml

abort
exit
- 명령어를 통한 방법
cat >| templates/loopback.xml << EOF <config-template xmlns="http://tail-f.com/ns/config/1.0" servicepoint="loopback"> <devices xmlns="http://tail-f.com/ns/ncs"> <device> <name>{/device}</name> <config> <interface xmlns="http://tail-f.com/ned/cisco-ios-xr"> <Loopback> <id>{/loopback-intf}</id> <ipv4> <address> <ip>{/ip-address}</ip> <mask>255.255.255.255</mask> </address> </ipv4> </Loopback> </interface> <interface xmlns="urn:ios"> <Loopback> <name>{/loopback-intf}</name> <ip> <address> <primary> <address>{/ip-address}</address> <mask>255.255.255.255</mask> </primary> </address> </ip> </Loopback> </interface> </config> </device> </devices> </config-template> EOF
- NSO cli 접속을 통한 방법
- 패키지 반영 및 서비스 인스턴스 생성
packages reload

config
loopback test device core-rtr0 loopback-intf 201 ip-address 192.168.10.1
top
commit dry-run outformat native

abort
exit
5. 서비스 모델 강화
잘못된 사용자 입력 방지
- 루프백 서비스의 YANG 모델을 통해 가능
vi ~/src/nso-instance/packages/loopback/src/yang/loopback.yang

    leaf device {
      type string;
    }

    leaf loopback-intf {
      type uint32;
    }

    leaf ip-address {
      type string;
    }

leaf 3개 추가
- 명령어를 통한 방법
cat >| ~/src/nso-instance/packages/loopback/src/yang/loopback.yang << EOF module loopback { namespace "http://com/example/loopback"; prefix loopback; import tailf-ncs { prefix ncs; } import ietf-inet-types { prefix inet; } import tailf-common { prefix tailf; } list loopback { key name; uses ncs:service-data; ncs:servicepoint "loopback"; leaf name { tailf:info "Service instance name"; type string; } leaf device { tailf:info "Device name"; type leafref { path "/ncs:devices/ncs:device/ncs:name"; } } leaf ip-address { tailf:info "IP address to configure on loopback interface"; type inet:ipv4-address; mandatory true; } leaf loopback-intf { tailf:info "Loopback interface number"; type uint32; } } } EOF - 페이지 빌드 및 reload
make -C ~/src/nso-instance/packages/loopback/src
ncs_cli -C -u admin
packages reload
- 적용 및 종료
loopback test device core-rtr0 loopback-intf 101 ip-address 192.168.10.1

abort
exit