Pre-req: Install dependencies
| 코드 블럭 |
|---|
# For Ubuntu
apt install build-essential
apt install python3-pyelftools
apt-get install -y libarchive-dev
apt-get install -y libelf-dev
apt install cmake
apt-get install -y pkg-config
apt-get install -y libdpdk-dev
apt-get install -y libnuma-dev
apt-get install git libpcap-dev

apt install python3-pip
pip3 install meson ninja
pip3 install meson ninja


# For Rocky/RHEL
dnf groupinstall "Development Tools"
dnf install numactl-devel
pip3 install meson ninja
pip3 install pyelftools


# For CentOS 7

yum -y install kernel-devel.x86_64
yum -y install numactl-devel.x86_64
yum -y install elfutils-libelf-devel
yum -y install libpcap-devel |
Pre-req: Install mlxofed pkg with --dpdk and --upstream-lib
| 코드 블럭 |
|---|
/mnt/mlnxofedinstall --without-fw-update --dpdk --upstream-libs --force
/etc/init.d/openibd restart |
Pre-req: Enable IOMMU for virtualization
| 코드 블럭 |
|---|
dmesg | grep -i -e DMAR -e IOMMU

# For rocky/centos
sudo nano /etc/default/grub

GRUB_CMDLINE_LINUX="..... intel_iommu=on iommu=pt pci=realloc"
sudo grub-mkconfig -o /boot/grub/grub.cfg

# For ubuntu
GRUB_CMDLINE_LINUX_DEFAULT="...... intel_iommu=on"
sudo grub-mkconfig -o /boot/grub/grub.cfg
reboot
|
If you want to create virtual function, first check in the firmware SRIOV_EN is 'enabled' or 'disabled'. Enable it if it isnt.
| 코드 블럭 |
|---|
mlxconfig -d /dev/mst/mt4119_pciconf0 q | grep SRIOV_EN

# Set the Number of VFs in the firmware
# Run mst start.

# Using the IDs obtained in the previous task, type the following:

sudo mlxconfig -d /dev/mst/mt4119_pciconf0set SRIOV_EN=1 NUM_OF_VFS=<number between 0-127>

sudo mlxconfig -d /dev/mst/mt4119_pciconf0 set SRIOV_EN=1 NUM_OF_VFS=8

sudo mlxconfig -d /dev/mst/mt4119_pciconf0 query

sudo mlxconfig -d /dev/mst/mt4119_pciconf0 query


#Update the firmware

sudo mst start
sudo mst status -v
sudo flint -d /dev/mst/mt4119_pciconf0 -i fw-download-from-official-website-based-on-psid-of-your-nic.bin burn

# Reboot for the settings to take effect.


cat /sys/class/net/enp10s0np0/device/mlx5_num_vfs

echo 8 > /sys/class/infiniband/mlx5_0/device/mlx5_num_vfs |
| 코드 블럭 |
|---|
wget https://git.dpdk.org/apps/pktgen-dpdk/snapshot/pktgen-dpdk-pktgen-23.06.1.tar.xz
tar xJf dpdk-23.03.tar.xz
or
echo 8 > /sys/class/net/ens785f0/device/sriov_numvfs
or
echo 8 > /sys/class/net/ens785f0/device/mlx5_num_vfs |
Build 'igb_uio' driver if needed
| 정보 |
|---|
If you wanna build 'igb_uio', follow below. In my case, it did not work for Mellanox Connect X5 (mlx_core driver was enough) |
...
| 코드 블럭 |
|---|
|
# 1. Using dpdk based python program
/usr/local/bin/dpdk-hugepages.py -p 1G --setup 32G

# 2. Insert 'nr_hugepages'
echo 4 > /sys/kernel/mm/hugepages/hugepages-1048576kB/nr_hugepages

# 3. The permanent option (but I won't recommend this, this makes the the grub penic attack in rocky linux and goes to emergency mode)
vi /etc/fstab

nodev /mnt/huge hugetlbfs pagesize=1GB 0 0 |
Download pktgen-dpdk from official website (make sure, the version of pktgen-dpdk is higher than dpdk → it's very fragile)
| 코드 블럭 |
|---|
export RTE_SDK=/root/dpdk-23.03
export RTE_TARGET=x86_64-native-linux-gcc

wget https://git.dpdk.org/apps/pktgen-dpdk/snapshot/pktgen-dpdk-pktgen-23.06.1.tar.xz
tar xJf pktgen-dpdk-pktgen-23.06.1.tar.xz
|
Following configuration can be applied if the expected bandwidth is not showing up for mellanox X5 (ref: https://stackoverflow.com/questions/72345569/why-does-dpdk-mellanox-connectx5-process-128b-packets-much-faster-than-other-s/72393527#72393527)
| 코드 블럭 |
|---|
systemctl stop irqbalance.service
systemctl disable irqbalance.service
systemctl stop wpa_supplicant
systemctl disable wpa_supplicant
./set_irq_affinity_cpulist.sh [non dpdk cores] [desired NIC]
mlxconfig -d [pcie device id] set SRIOV_EN=0
mlx_tune -r
ifconfig [NIC] txqueuelen 20000
ethtool -G [NIC] rx 8192 tx 8192
ethtool -A [NIC] rx off tx off
mlxconfig -d [pcie address] set ZERO_TOUCH_TUNING_ENABLE=1
mlxconfig -d [pcie address] set CQE_COMPRESSION=1
mlxconfig -d [pcie address] s PCI_WR_ORDERING=1 |
Testing between two servers. We are using 8 virtual function in each server but not utilizing all of them.
| 코드 블럭 |
|---|
| Sender: /usr/local/bin/pktgen --huge-dir /dev/hugepages -l 1-10 -n 2 -- -P -m '[0:2-8].2-6' -T |
| | 코드 블럭 |
|---|
| Receiver: /usr/local/bin/pktgen --huge-dir /dev/hugepages -l 1-10 -n 2 -- -P -m '[2-5:6-10].0' -T -s 2:output.pcap |
|  Image Removed Image Removed
|  Image Removed
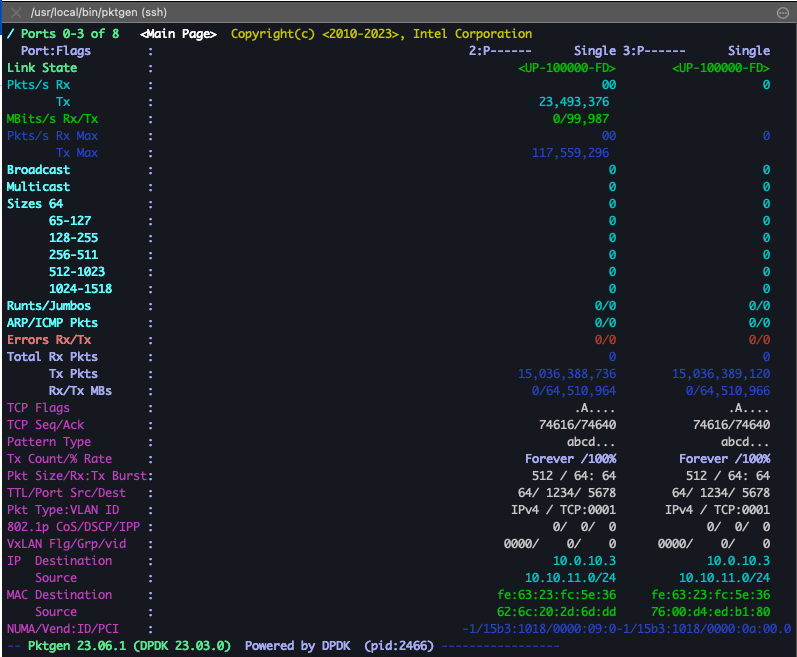 Image Added Image Added
| 코드 블럭 |
|---|
Pktgen:/> set 2-6 src ip 10.10.11.0/24
Pktgen:/> set 2-6 dst ip 10.0.10.3
Pktgen:/> set 2-6 dst mac fe:63:23:fc:5e:36
Pktgen:/> set 2-6 size 512
Pktgen:/> start 2-6 |
| Image Added |
Some helpful config in pkt-gen: https://stackoverflow.com/questions/73218563/dpdk-pktgen-how-to-change-rate-of-packet-transmission