Architectures
         INTERNET
External     |
         eno1|
+------------+------------+
|                         |
|           HOST          |
|             +----------+|
|             | RDP-VM   ||
|             |172.19.0.3||
|             +----------+|
+------------+------------+
    br0(eno2)|172.19.0.1
Internal     |
             |
          Servers
(IPMI,iDRAC,iKVM../172.19.0.X)
Install
sudo yum -y install dnsmasq cockpit-machines httpd policycoreutils-python-utils
sudo systemctl restart cockpit.socket
sudo systemctl enable --now cockpit.socket
sudo systemctl enable --now dnsmasq
sudo systemctl enable --now httpd
Change SSH Port (if needed)
Follow instructions on the below documents
Network Configs
Connect to Cockpit
Connect to Cockpit via https://<IP>:9090
Login as your root user

Create Bridge
Cockpit → Networking → Add Bridge
Change Name to 'br0' and add Ports(NICs) for the internal network.


Click br0 → Click IPv4 - Automatic (DHCP)


Click Manual → Insert internal information


NAT config (if needed)
Enable ip_forward
sudo vi /etc/sysctl.conf

# Add the following line
net.ipv4.ip_forward = 1

# Apply sysctl.conf without reboot
sudo sysctl -p /etc/sysctl.conf
Add MASQUERADE rule
sudo -s

INT=br0
EXT=eno1
firewall-cmd --permanent --zone=public --add-masquerade
firewall-cmd --permanent --direct --add-rule ipv4 nat POSTROUTING 0 -o $EXT -j MASQUERADE
firewall-cmd --permanent --direct --add-rule ipv4 filter FORWARD 0 -i $INT -o $EXT -j ACCEPT
firewall-cmd --permanent --direct --add-rule ipv4 filter FORWARD 0 -i $EXT -o $INT -m state --state RELATED,ESTABLISHED -j ACCEPT
firewall-cmd --reload
Port Forward (of Windows VM for Remote Desktop)
sudo firewall-cmd --permanent --zone=public --add-forward-port=port=<YOUR_RDP_PORT>:proto=tcp:toport=3389:toaddr=172.19.0.3
sudo firewall-cmd --permanent --add-port=<YOUR_RDP_PORT>/tcp
sudo firewall-cmd --reload
Firewall Settings
sudo firewall-cmd --permanent --zone=public --add-service=cockpit
sudo firewall-cmd --permanent --zone=public --add-service=dhcp
sudo firewall-cmd --permanent --zone=public --add-service=dns
sudo firewall-cmd --permanent --zone=public --add-service=samba
sudo firewall-cmd --permanent --zone=public --add-service=http
sudo firewall-cmd --permanent --zone=public --add-port=<YOUR_SSH_PORT>/tcp
sudo firewall-cmd --permanent --zone=public --add-port=<YOUR_RDP_PORT>/tcp
sudo firewall-cmd --reload
DHCP Sever Configs
nameserver 8.8.8.8
nameserver 134.75.30.1
nameserver 1.1.1.1
interface=br0
except-interface=lo
bind-interfaces
listen-address=127.0.0.1
listen-address=172.19.0.1

#domain-needed
bogus-priv
#no-resolv
resolv-file=/etc/dnsmasq-resolv.conf
#filterwin2k
expand-hosts
domain=kisti.kr
local=/kisti.kr/

dhcp-option=option:netmask,255.255.255.0
dhcp-option=option:router,172.19.0.1
dhcp-option=option:dns-server,172.19.0.1,8.8.8.8
dhcp-option=option:ntp-server,141.223.182.106 # ntp.postech.ac.kr

dhcp-range=172.19.0.2,172.19.0.253,5m
dhcp-lease-max=252

dhcp-leasefile=/var/lib/dnsmasq/bmc.leases
Make bmc-hosts.conf with respect to asset number.
자산번호를 참고하여 bmc-hosts.conf 작성
It is good to write some comments on the asset after #
샾(#) 다음에 자산과 관련된 메모를 남기면 좋음
dhcp-host=52:54:00:3B:D9:A6,RDP-VM,172.19.0.3 # rdp
dhcp-host=AC:1F:6B:F9:25:CD,2019001231-bmc,172.19.0.15  #   1G PS  ; 2019.
dhcp-host=AC:1F:6B:F9:31:63,2020000561-bmc,172.19.0.17  #  10G PS  ; DS20A5S120010
dhcp-host=AC:1F:6B:F9:32:45,2020000562-bmc,172.19.0.19  #  10G PS  ; DS20A5S120012
You can access the control (iDRAC, IPMI, ...) via asset number - https://<asset number>.kisti.kr
자산번호로 관리콘솔 (iDRAC, IPMI, ...)에 접속 가능함


sudo systemctl restart dnsmasq
Create Windows VM for Remote Management
Connect to Cockpit
Connect to Cockpit via https://<IP>:9090
Login as your root user
Enable Libvirt (if needed)

Create Virtual Machine
Put Win10 Pro ISO on /ISOs, then create VM

Check Network

add the following line in bmc-hosts.conf and restart dnsmasq
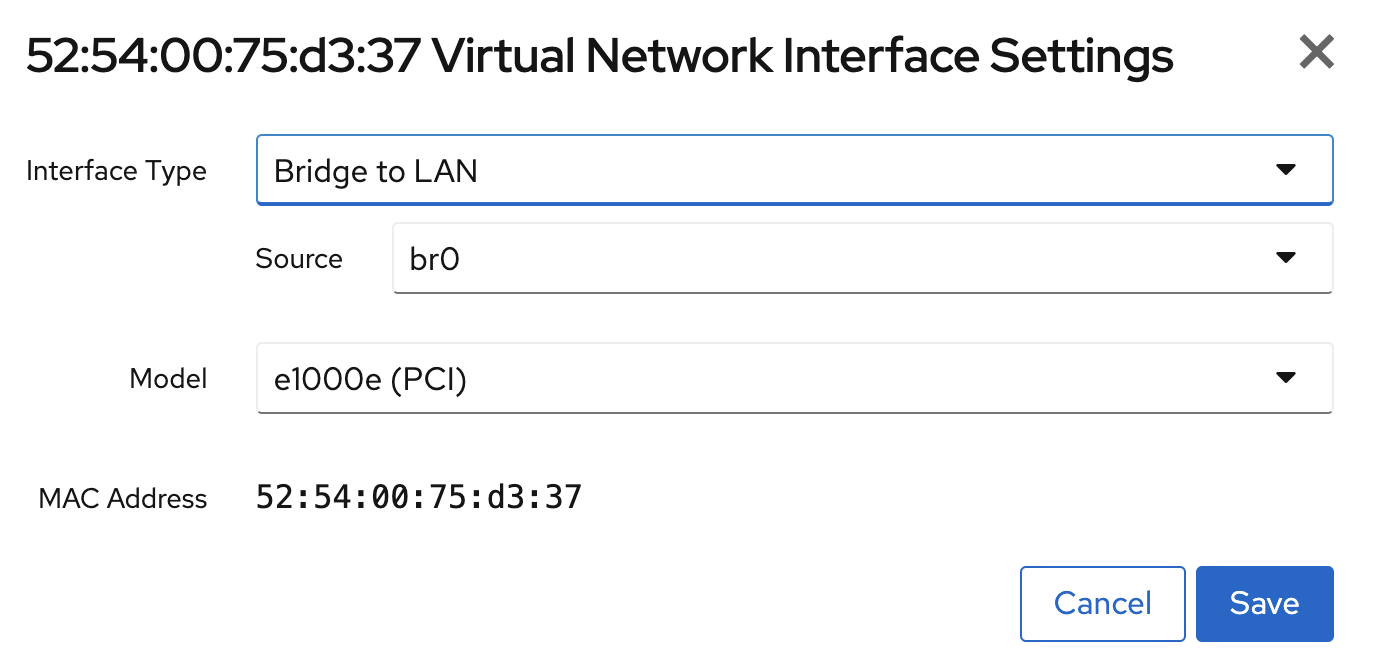
dhcp-host=52:54:00:75:d3:37,RDP-VM,172.19.0.3 # rdp
Modify Network (to bridge)
Install Windows on VM


- How to skip the security questions during the Windows 10 Setup
- 설치할 때, 암호 찾기 질문(3개) 건너 뛰는 방법
- 암호를 입력하지 않고 다음 클릭
Config on VM
- Disable automatic updates on Windows 10 permanently
- Enable Remote Desktop
- Install Chrome
- Install some programs you needed
- 윈도우 업데이트 끄기
- 원격데스크탑 설치
- 크롬 설치
- 기타 프로그램 설치
Connect to VM via Remote Desktop

SAMBA Configs
Download ISO images, Change selinux context
sudo mkdir /ISOs
chmod 777 /ISOs
cd /ISOs
wget http://ftp.kaist.ac.kr/CentOS/8.2.2004/isos/x86_64/CentOS-8.2.2004-x86_64-minimal.iso
wget http://ftp.kaist.ac.kr/ubuntu-cd/20.10/ubuntu-20.10-desktop-amd64.iso
wget http://ftp.kaist.ac.kr/ubuntu-cd/20.10/ubuntu-20.10-live-server-amd64.iso
...

sudo chown -R nobody:nobody /ISOs
sudo chmod 644 /ISOs/*.iso
sudo chcon -t samba_share_t /ISOs
sudo semanage fcontext -a -t samba_share_t /ISOs
sudo setsebool -P samba_export_all_rw on
Change configs
[global]
server min protocol = NT1
bind interfaces only = yes
interfaces = lo br0
workgroup = WORKGROUP
log level = 2
map to guest = Bad User
log file = /var/log/samba/log.%m

[ISOs]
path = /ISOs
public = yes
browsable = yes
read only = yes
Check status
sudo systemctl status smb
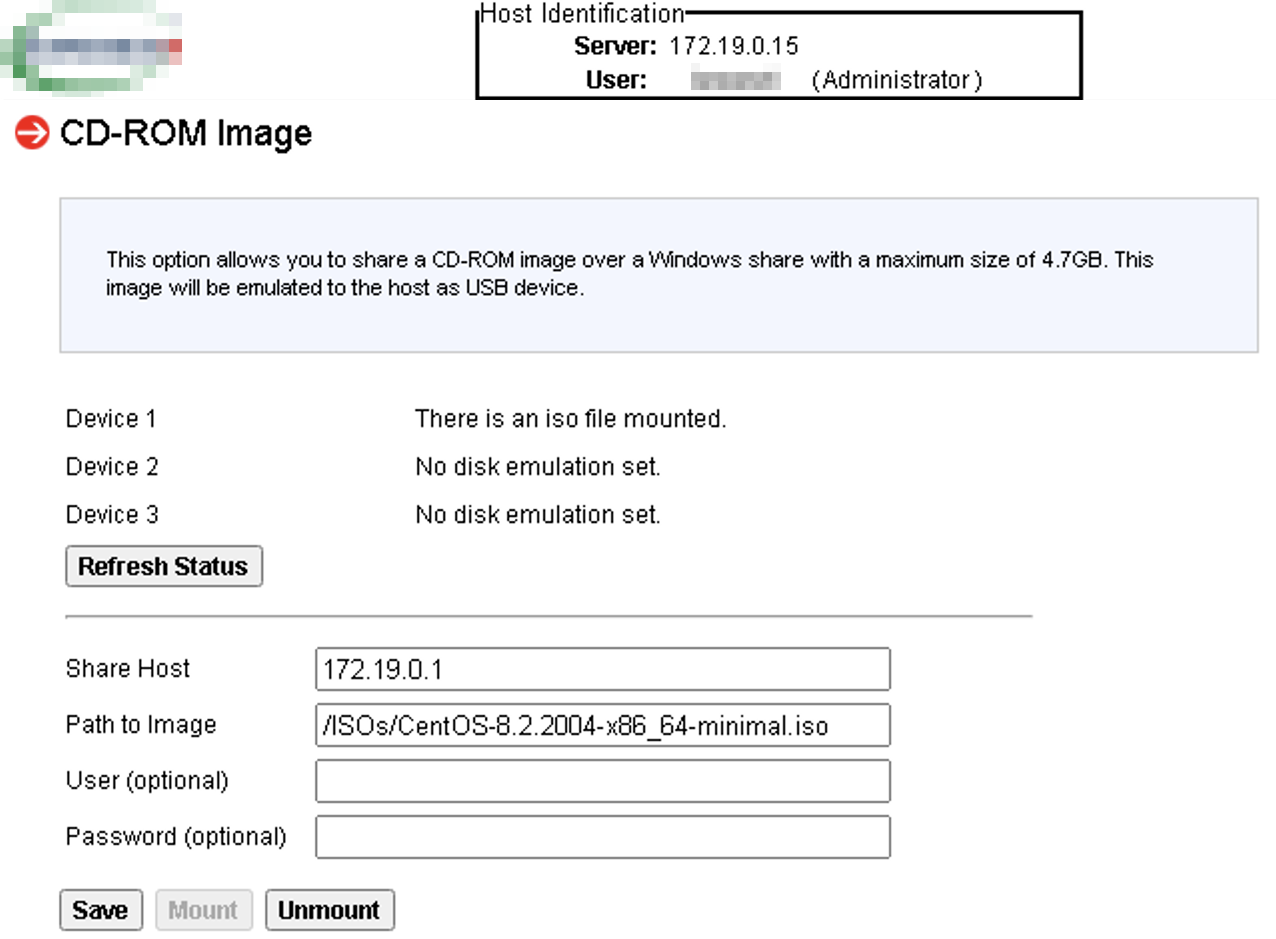
Mount ISO image on BMC (iDRAC, IPMI, ...)
| Check the logs on samba server to access the ISO file on via IPMI # tail -f /var/log/samba/log.172.19.0.15 ... [2020/11/04 13:39:45.950194, 2] ../../source3/smbd/open.c:1456(open_file) ...... opened file CentOS-8.2.2004-x86_64-minimal.iso read=Yes write=No (numopen=1) |
Change Service Initiation Order
Add [After=network-online.target] on [dnsmasq.service] in [UNIT] section
[Unit]
Description=DNS caching server.
After=network.target
After=network-online.target
...
Add [After=dnsmasq.service] on [libvirtd.service] in [UNIT] section
[Unit]
Description=Virtualization daemon
...
After=network.target
After=dnsmasq.service