-
작성자:
 장민석(KN), 마지막 업데이트: 2020-11-04
4분 읽기
장민석(KN), 마지막 업데이트: 2020-11-04
4분 읽기
Architectures
         INTERNET
External     |
         eno1|
+------------+------------+
|                         |
|           HOST          |
|             +----------+|
|             | RDP-VM   ||
|             |172.19.0.3||
|             +----------+|
+------------+------------+
    br0(eno2)|172.19.0.1
Internal     |
             |
Servers (IPMI,iDRAC,iKVM..)
Install
sudo yum -y install dnsmasq cockpit-machines httpd
sudo systemctl restart cockpit.socket
sudo systemctl enable --now cockpit.socket
sudo systemctl enable --now dnsmasq
sudo systemctl enable --now httpd
Network Configs
Connect to Cockpit
Connect to Cockpit via https://<IP>:9090
Login as your root user

Create Bridge
Cockpit → Networking → Add Bridge
Change Name to 'br0' and add Ports(NICs) for the internal network.


Click br0 → Click IPv4 - Automatic (DHCP)


Click Manual → Insert internal information


NAT config (if needed)
Enable ip_forward
sudo vi /etc/sysctl.conf

# Add the following line
net.ipv4.ip_forward = 1

# Apply sysctl.conf without reboot
sudo sysctl -p /etc/sysctl.conf
Add MASQUERADE rule
sudo -s

INT=br0
EXT=eno1
firewall-cmd --permanent --zone=public --add-masquerade
firewall-cmd --permanent --direct --add-rule ipv4 nat POSTROUTING 0 -o $EXT -j MASQUERADE
firewall-cmd --permanent --direct --add-rule ipv4 filter FORWARD 0 -i $INT -o $EXT -j ACCEPT
firewall-cmd --permanent --direct --add-rule ipv4 filter FORWARD 0 -i $EXT -o $INT -m state --state RELATED,ESTABLISHED -j ACCEPT
firewall-cmd --reload
Port Forward (of Windows VM for Remote Desktop)
sudo firewall-cmd --permanent --zone=public --add-forward-port=port=<YOUR_RDP_PORT>:proto=tcp:toport=3389:toaddr=172.19.0.3
sudo firewall-cmd --permanent --add-port=<YOUR_RDP_PORT>/tcp
sudo firewall-cmd --reload
Firewall Settings
sudo firewall-cmd --zone=public --add-service=cockpit
sudo firewall-cmd --zone=public --add-service=dhcp
sudo firewall-cmd --zone=public --add-service=dns
sudo firewall-cmd --zone=public --add-service=samba
sudo firewall-cmd --zone=public --add-service=http
sudo firewall-cmd --permanent --add-port=<YOUR_SSH_PORT>/tcp
sudo firewall-cmd --permanent --add-port=<YOUR_RDP_PORT>/tcp
sudo firewall-cmd --reload
DHCP Sever Configs
nameserver 8.8.8.8
nameserver 134.75.30.1
nameserver 1.1.1.1
interface=br0
except-interface=lo
bind-interfaces
listen-address=127.0.0.1
listen-address=172.19.0.1

#domain-needed
bogus-priv
#no-resolv
resolv-file=/etc/dnsmasq-resolv.conf
#filterwin2k
expand-hosts
domain=kisti.kr
local=/kisti.kr/

dhcp-option=option:netmask,255.255.255.0
dhcp-option=option:router,172.19.0.1
dhcp-option=option:dns-server,172.19.0.1,8.8.8.8
dhcp-option=option:ntp-server,141.223.182.106 # ntp.postech.ac.kr

dhcp-range=172.19.0.2,172.19.0.253,5m
dhcp-lease-max=252

dhcp-leasefile=/var/lib/dnsmasq/bmc.leases
Make bmc-hosts.conf with respect to asset number.
자산번호를 참고하여 bmc-hosts.conf 작성
It is good to write some comments on the asset after #
샾(#) 다음에 자산과 관련된 메모를 남기면 좋음
dhcp-host=52:54:00:3B:D9:A6,RDP-VM,172.19.0.3 # rdp
dhcp-host=AC:1F:6B:F9:25:CD,2019001231-bmc,172.19.0.15  #   1G PS  ; 2019.
dhcp-host=AC:1F:6B:F9:31:63,2020000561-bmc,172.19.0.17  #  10G PS  ; DS20A5S120010
dhcp-host=AC:1F:6B:F9:32:45,2020000562-bmc,172.19.0.19  #  10G PS  ; DS20A5S120012
You can access the control (iDRAC, IPMI, ...) via asset number - https://<asset number>.kisti.kr
자산번호로 관리콘솔 (iDRAC, IPMI, ...)에 접속 가능함


sudo systemctl restart dnsmasq
Create Windows VM for Remote Management
Connect to Cockpit
Connect to Cockpit via https://<IP>:9090
Login as your root user
Enable Libvirt (if needed)

Create Virtual Machine
Put Win10 Pro ISO on /ISOs, then create VM

Check Network

add the following line in bmc-hosts.conf and restart dnsmasq
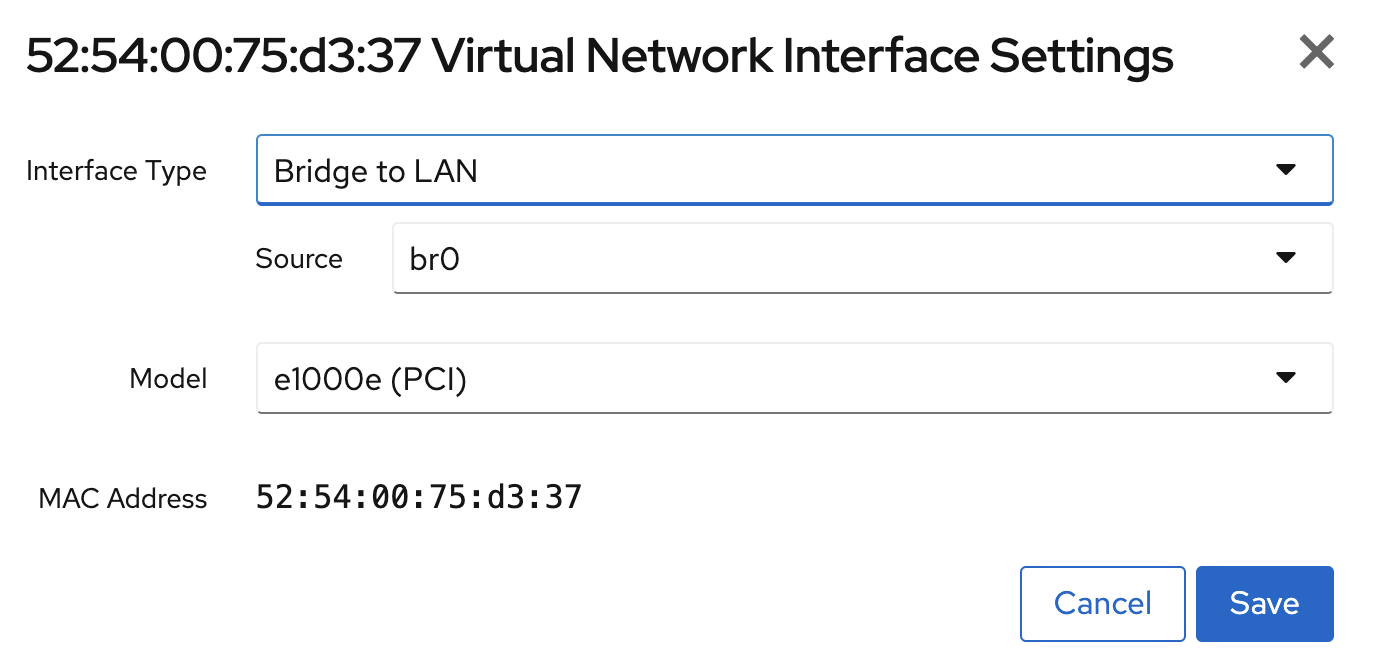
dhcp-host=52:54:00:75:d3:37,RDP-VM,172.19.0.3 # rdp
Modify Network (to bridge)
Install Windows on VM


It would be helpful to skip security questions on windows installation.
How to skip the security questions during the Windows 10 Setup
Config on VM
Do config for Remote Desktop
Install some programs you needed
Connect to VM via Remote Desktop

SAMBA Configs
Download ISO images, Change selinux context
sudo mkdir /ISOs
chmod 777 /ISOs
cd /ISOs
wget http://ftp.kaist.ac.kr/CentOS/8.2.2004/isos/x86_64/CentOS-8.2.2004-x86_64-minimal.iso
wget http://ftp.kaist.ac.kr/ubuntu-cd/20.10/ubuntu-20.10-desktop-amd64.iso
wget http://ftp.kaist.ac.kr/ubuntu-cd/20.10/ubuntu-20.10-live-server-amd64.iso
...

sudo semanage fcontext -a -t samba_share_t /ISOs
Change configs
[global]
server min protocol = NT1
bind interfaces only = yes
interfaces = lo br0
workgroup = WORKGROUP
log level = 2
map to guest = Bad User
log file = /var/log/samba/log.%m

[ISOs]
path = /ISOs
public = yes
browsable = yes
read only = yes
Change configs
sudo systemctl status smb
Change configs
sudo systemctl status smb
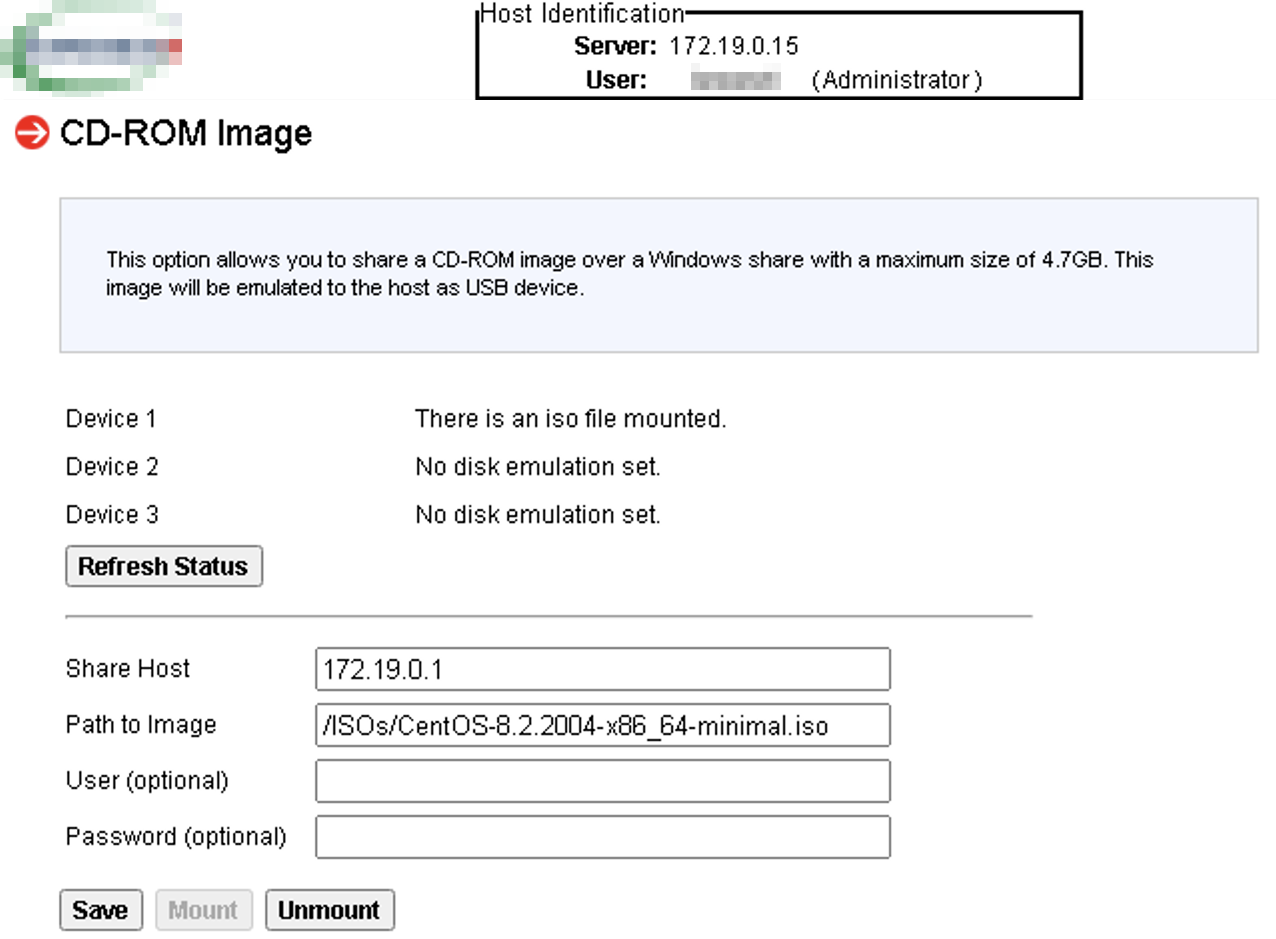
Mount ISO image on BMC (iDRAC, IPMI, ...)
| Check the logs on samba server to access the ISO file on via # tail -f /var/log/samba/log.172.19.0.15 ... [2020/11/04 13:39:45.950194, 2] ../../source3/smbd/open.c:1456(open_file) ...... opened file CentOS-8.2.2004-x86_64-minimal.iso read=Yes write=No (numopen=1) |